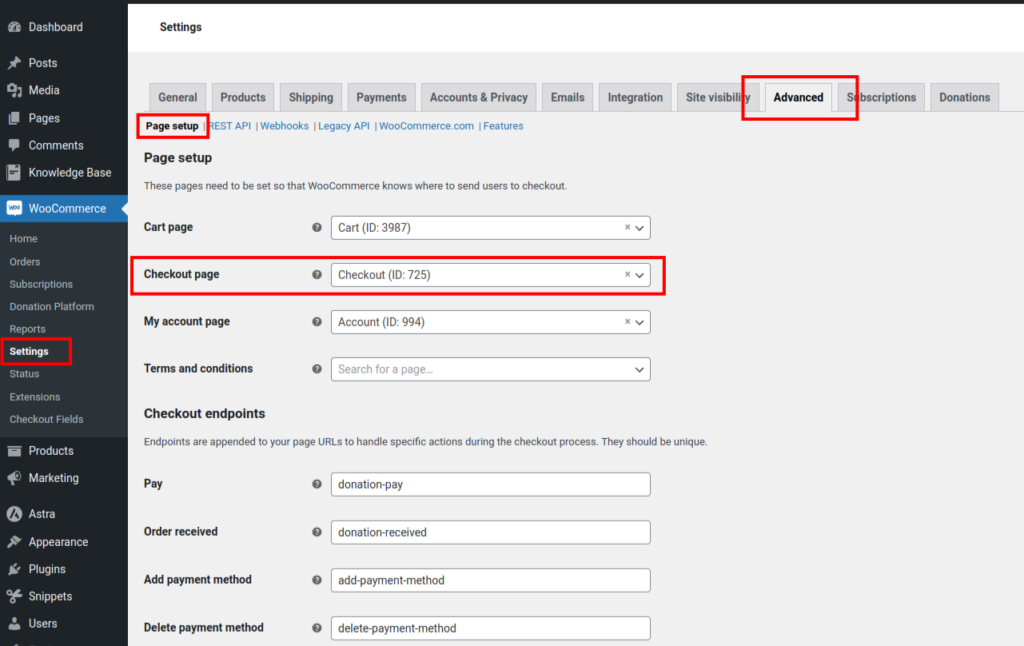
Properly configuring the checkout page in WooCommerce is crucial for ensuring a smooth and seamless user experience. If the checkout page is not set correctly, users may be redirected to the homepage instead of proceeding to checkout, causing confusion and potentially losing donations. This guide will walk you through the steps to properly set up your WooCommerce checkout page.
Steps to Configure the WooCommerce Checkout Page

Follow these steps to ensure that your WooCommerce checkout page is correctly set up:
- Log into your WordPress Admin Dashboard:
- Open your web browser and go to your WordPress login page.
- Enter your username and password, then click ‘Log In.’
- Navigate to WooCommerce Settings:
- On the left-hand sidebar, hover over ‘WooCommerce.’
- Click on ‘Settings’ from the dropdown menu.
- Go to the Advanced Settings:
- In the WooCommerce Settings menu, click on the ‘Advanced’ tab.
- Set the Checkout Page:
- In the Advanced settings, you will see a section labeled ‘Checkout Page.’
- Use the dropdown menu to select the page you have designated as your checkout page. This page should be created and contain the
[woocommerce_checkout]shortcode to function correctly.
- Save Changes:
- After selecting the correct checkout page, scroll down and click the ‘Save changes’ button.
Verifying the Checkout Page Configuration
After setting the checkout page, it’s important to verify that it is working correctly:
- Navigate to Your Storefront:
- Visit your website and add open a donation product page.
- Proceed to Checkout:
- Select a donation amount and click “Donate”.
- Check the URL:
- Ensure that the URL leads to your designated checkout page and not the homepage.
- Test a Transaction:
- Optionally, you can test a transaction to ensure everything is functioning as expected.
Troubleshooting
If you encounter any issues with the checkout page, consider the following troubleshooting steps:
- Page Shortcode: Ensure that the checkout page contains the
[woocommerce_checkout]shortcode. - Theme Conflicts: Sometimes, the active theme might cause issues. Try switching to a default WooCommerce theme like Storefront.
- Plugin Conflicts: Disable other plugins one by one to identify if there is a conflict.
- Permalink Settings: Go to ‘Settings’ -> ‘Permalinks’ and simply click ‘Save Changes’ to refresh the permalinks.
Conclusion
Setting up the WooCommerce checkout page correctly is a simple yet crucial task for setting up Donation Platform for WooCommerce. By following these steps, you ensure that your donors have a seamless and professional experience when they decide to support your cause. For further assistance, refer to the WooCommerce documentation or contact support.
By maintaining a properly configured checkout page, you not only enhance the user experience but also increase the likelihood of successful donations, thereby supporting your organization’s mission effectively.
